Pipe TEE branch Reinforcing Pad 90° PDF chart | 2″ × 2″ to 10″ × 50″
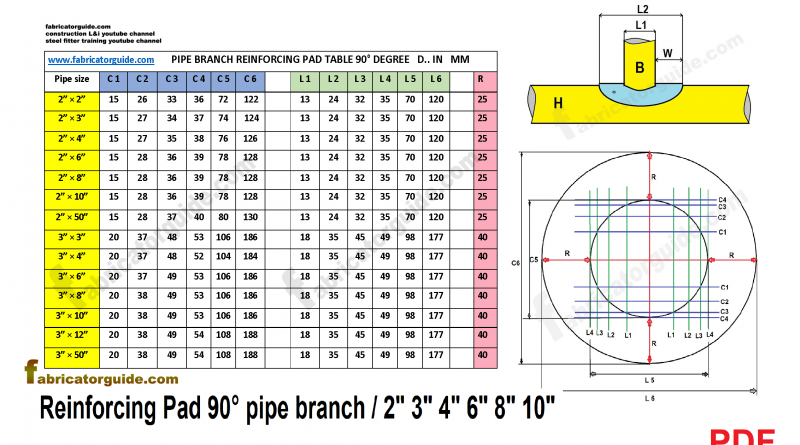
90 degree pipe branch reinforcing pad 2″ × 2″ to 2″ × 50″ and 10″ × 10″ to 10″ × 50″ chart
TEE Branch branch pipe size 2″ 3″ 4″ 6″ 8″ 10″
TEE Branch Header pipe size 2″ 3″ 4″ 6″ 8″ 10″ 12″ 14″ 16″ 18″ 20″ 22″ 24″ 26″ 28″ 30″ 32″ 34″
36″ 38″ 40″ 42″ 44″ 46″ 48″ 50″
,
रिइंफोर्सिंग पैड बनाएं पीडीएफ चार्ट के जरिए 90 डिग्री पाइप ब्रांच
इक्वल और अनइक्वल
Create Reinforcing Pad 90 Degree Pipe Branch with PDF Chat
Equal and Unequal
इस पीडीएफ चार्ट के जरिए आप बिलकुल आसानी से मार्किंग कर सकते हैं रिइंफोर्सिंग पैड
देख सकते हैं यह फोटो में किस तरीका से डिजाइन किया गया है और नीचे पीडीएफ चार्ट दिया गया है जिसमें
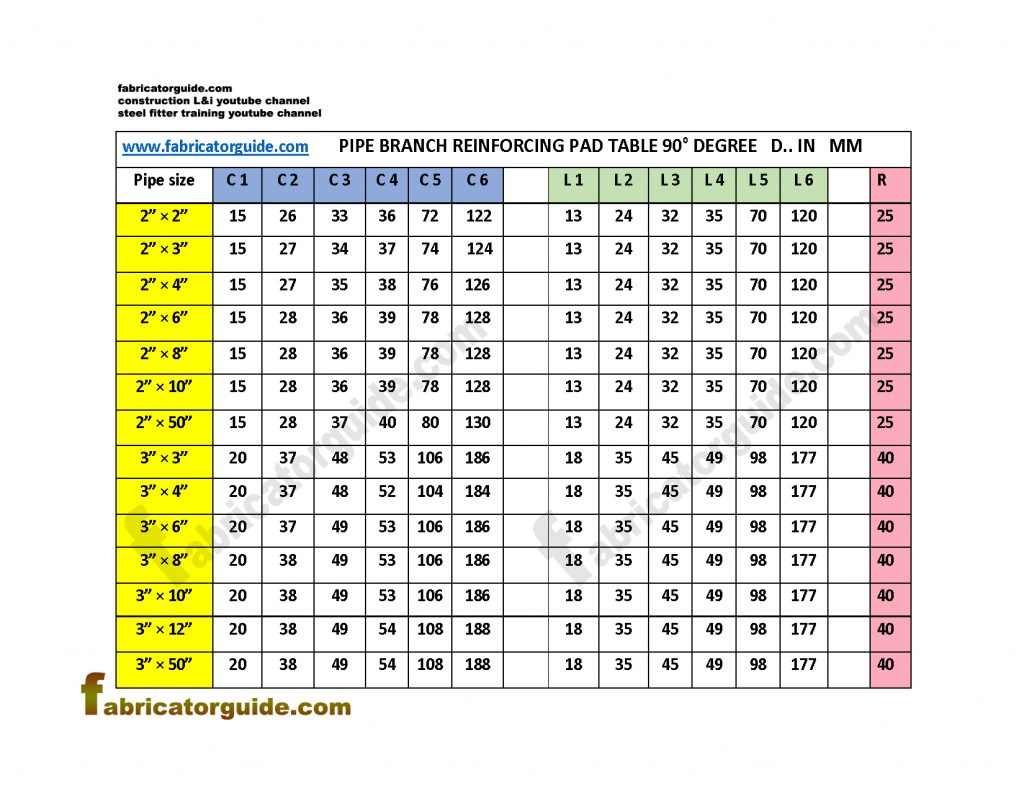
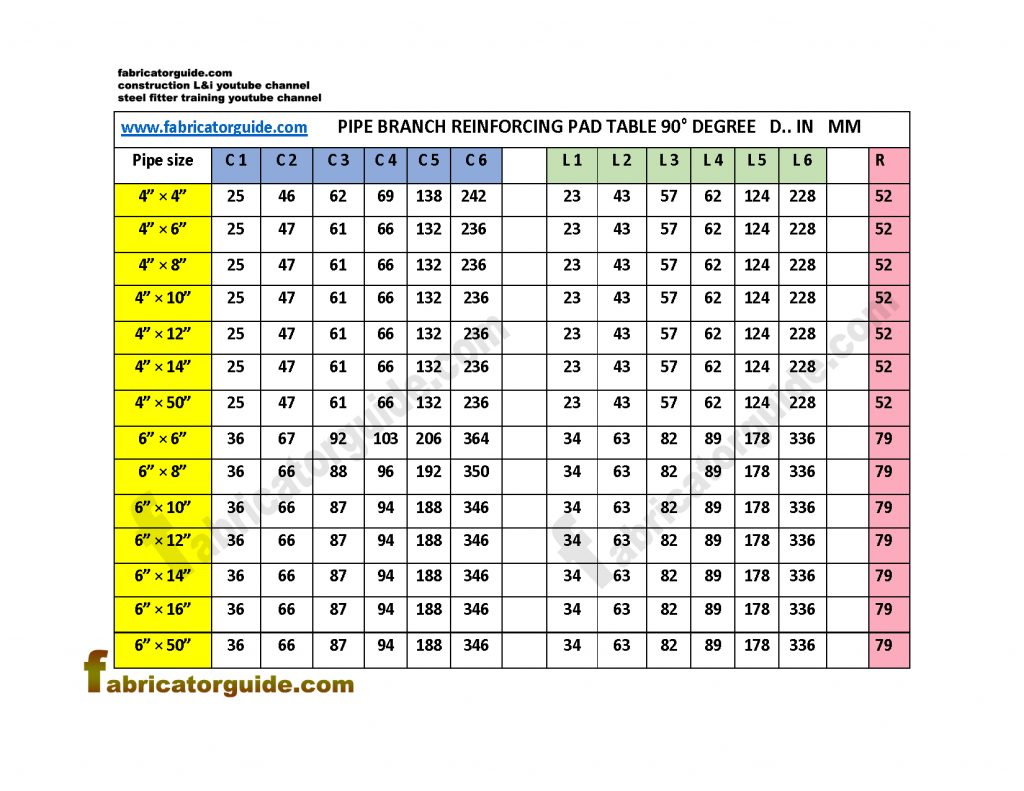
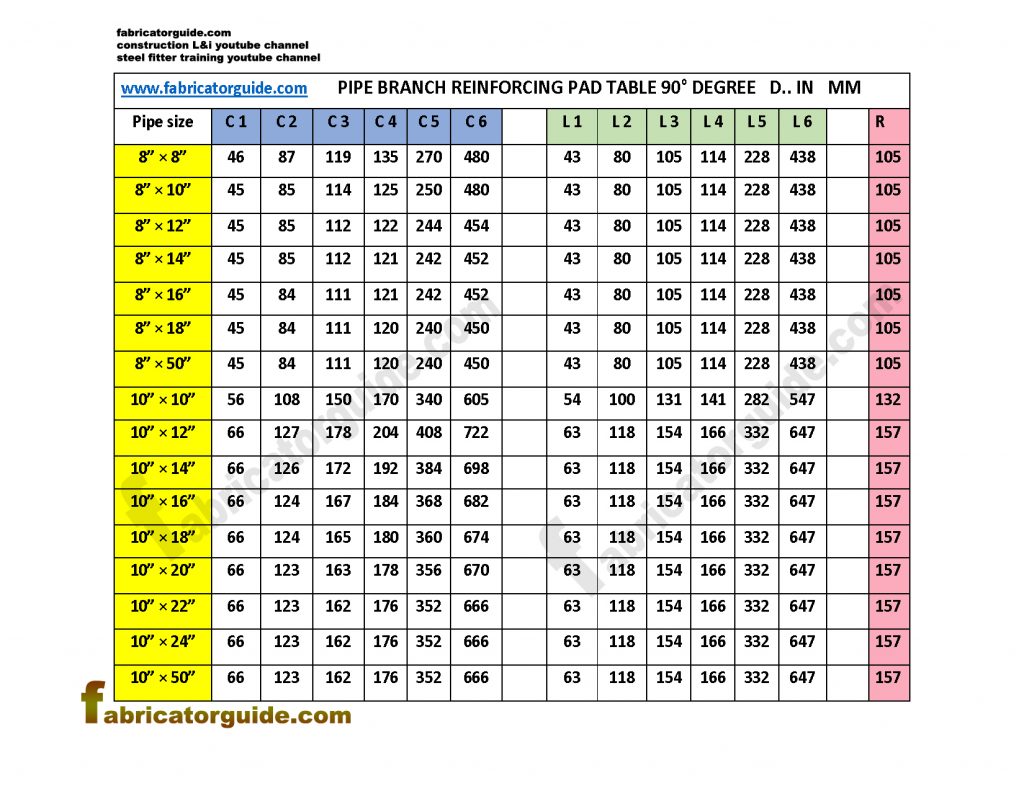
2″ × 2″ to 2″ × 50″ इंच से लेकर के
10″ × 10″ to 10″ × 50″ इंच तक है
जैसे 2″ × 2″ बनाना हो या 2″ × 4″ का बनाना हो या
2″ × 10″ का बनाना हो या
2″ × 20″ का बनाना हो सभी का मार्किंग सिर्फ 1 pdf चार्ट के जरिए कर सकते हैं
,,
2″ × 10″ डायमेंशन के बाद पाइप साइज नहीं लिखा गया है क्योंकि 2″ × 10″ के बाद 2″ × 50″ तक सेम डाइमेंशन आता है
इसीलिए डायरेक्ट 2″ × 50″ डाइमेंशन लिख दिया गया है
Through this PDF chart, you can marking the reinforcing pad very easily,
see how it is designed in the photo and below is given the PDF chart with
2 “× 2” to 2 “× 50” inch Ranging from 3 “× 3” to 3 “× 50” inch
Such as making 2 “× 2” or making of 2 “× 4” or making of
2 “× 10” or making of 2 “× 20”, all can be marked by just 1 pdf chart.
Pipe size is not mentioned after 2″ × 10″ dimension because after 2″ × 10″ comes the same dimension till 2″ × 50″
That’s why the direct dimension is 2″ × 50″
पाइप के ऊपर मार्किंग करने का तरीका
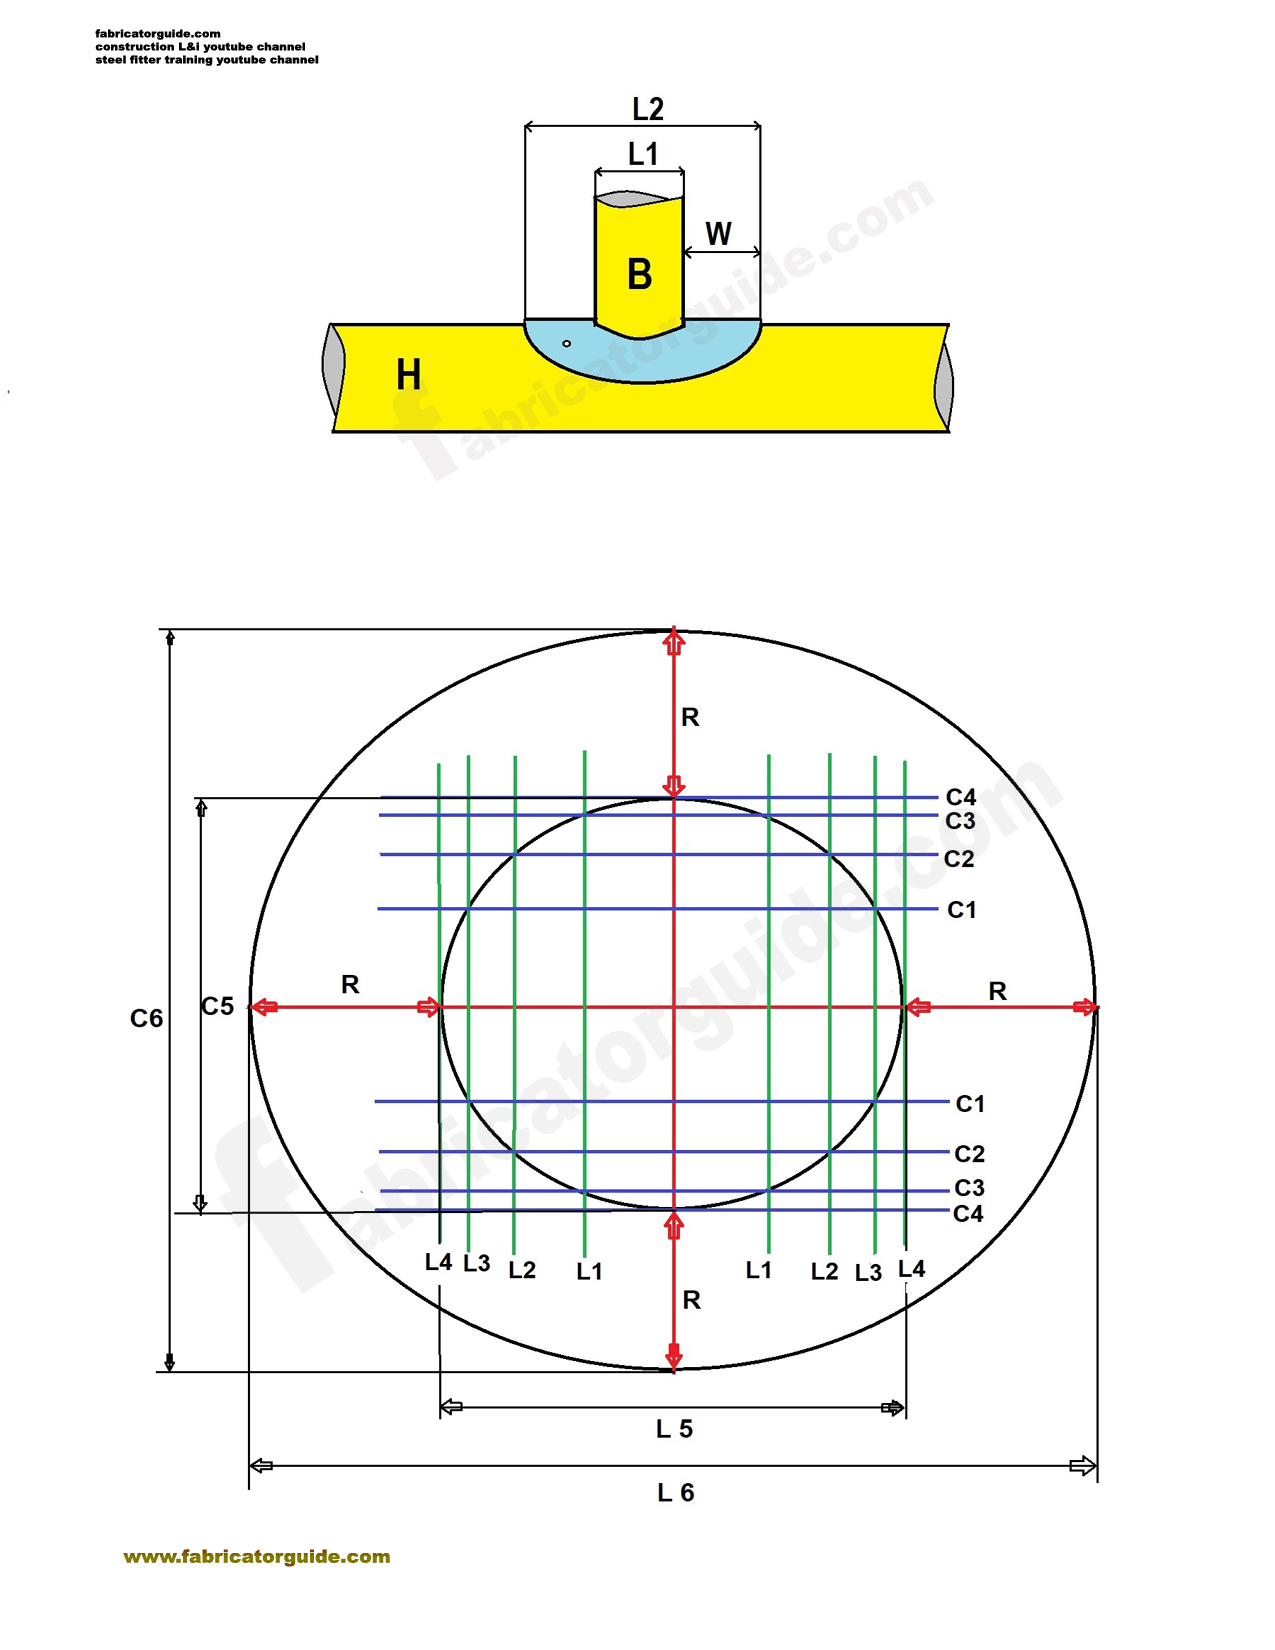
पाइप के ऊपर पहले दो सेंटर लाइन मार्किंग करेंगे जैसे देख सकते हैं रेड कलर में मार्किंग किया गया है एक वेर्टिकल लाइन और एक होरिजेंटल लाइन
होरिजेंटल सेंटर लाइन से C1 C2 C3 C4 का होरिजेंटल लाइन मार्किंग करेंगे दोनों साइड
ब्रांच पाइप के आउटसाइड तक C5 डायमेंशन आएगा
रिइंफोर्सिंग पैड का आउटसाइड टू आउटसाइड डायमेंशन C6 आएगा
वेर्टिकल सेंटर लाइन से L1 L2 L3 L4 का होरिजेंटल लाइन मार्किंग करेंगे दोनों साइड
ब्रांच पाइप के आउटसाइड तक L5 डायमेंशन आएगा
पीडीएफ चार्ट में लास्ट कॉलम में R डायमेंशन दिया गया है उसके जरिए रिइंफोर्सिंग का आउट साइड रेडियस मार्किंग कर सकते हैं
रिइंफोर्सिंग पैड का आउटसाइड टू आउटसाइड डायमेंशन L6 आएगा
Pipe Marking Method
The first two center lines above the pipe will be marked as seen in red color marked with a vertical line and a horizontal line
Both sides will mark the horizontal line of the C1 C2 C3 C4 from the horizontal center line
C5 dimension will come to the outside of the branch pipe
Outside Dimension C6 of Reinforcing Pad will come
Both sides will mark the horizontal line of L1 L2 L3 L4 from the Vedical Center line
L5 dimension will come to the outside of the branch pipe
R Dimension is given in the last column in the PDF chart, through which out-side radius of reinforcing can be marked
Outside Dimension L6 of Reinforcing Pad will come
यह पीडीएफ चार्ट किस तरह से काम कर रहा है आप यूज करके हमें जरूर बताएं
Please use this PDF chart and let us know how it works.
Thanks for visit my website

How you find these values?